Telegram Bot Integration
Telegram bots are fast becoming the go-to interface for crypto apps—used for everything from executing trades to powering automated cross-border remittances. With Dynamic Server Wallets, you can bring secure, wallet infrastructure directly into your Telegram bots to create seamless experiences without browser extensions or wallet popups.
Dynamic Server Wallets run on your backend, allowing bots to sign transactions, manage assets, and interact with smart contracts—all in response to Telegram commands or workflows. This enables a wide range of powerful use cases:
- Stablecoin Remittances: Set up recurring payments to family members (or anyone else) by their Telegram usernames, making it easy to automate weekly or monthly transfers without requiring recipients to manage complex wallet addresses.
- Trading Bots: Execute swaps, limit orders, or rebalance strategies via chat commands or automated triggers.
- Portfolio Management: Query wallet balances, track performance, and reallocate assets—all from Telegram.
In this guide, you’ll learn how to create a Telegram bot that uses Dynamic’s server wallets infrastructure to provide wallet functionality to Telegram users. If you want to take a quick look at the final code, check out the GitHub repository.
Dynamic server wallets will work on EVM, SVM and Sui. More chain support coming soon.
This guide uses our new TSS MPC embedded wallets. Learn more about it
here. Overview
This Telegram bot integration allows users to:
- Create EVM-compatible wallets
- Send crypto to other addresses
- Sign messages with their wallet
The implementation uses:
- Dynamic’s server wallets: Creation and handling of wallet & signatures
- Supabase: Stores user wallets linked with Telegram IDs
- Grammy: A framework for building Telegram bots with TypeScript
- Viem: Handles Ethereum blockchain interactions and transaction formatting
Setup
Before starting, you’ll need:
Dynamic Environment Setup
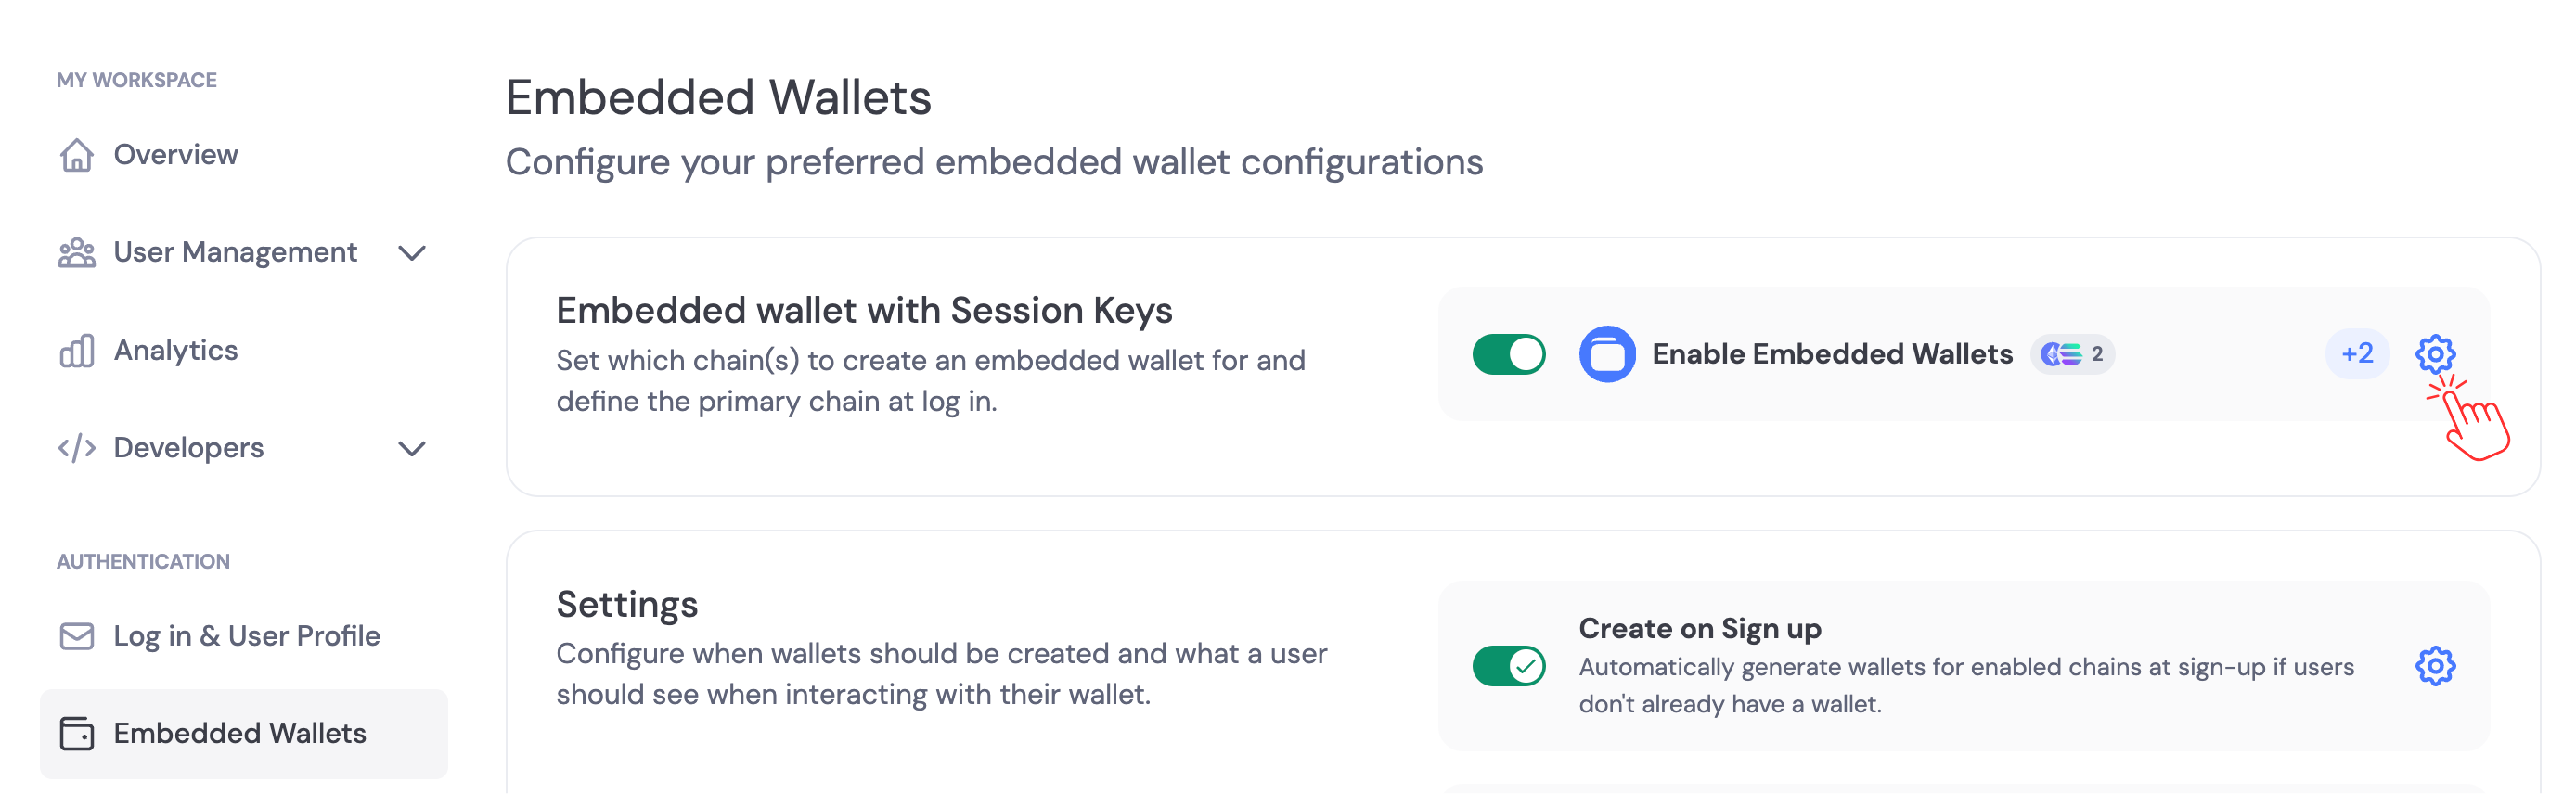
Create a new environment in the Dynamic dashboard. Since TSS MPC wallets are available only in beta, you’ll need to request access to enable it for your environment.
- Navigate to the Dynamic Dashboard > Developers
- Enable “Embedded Wallets”
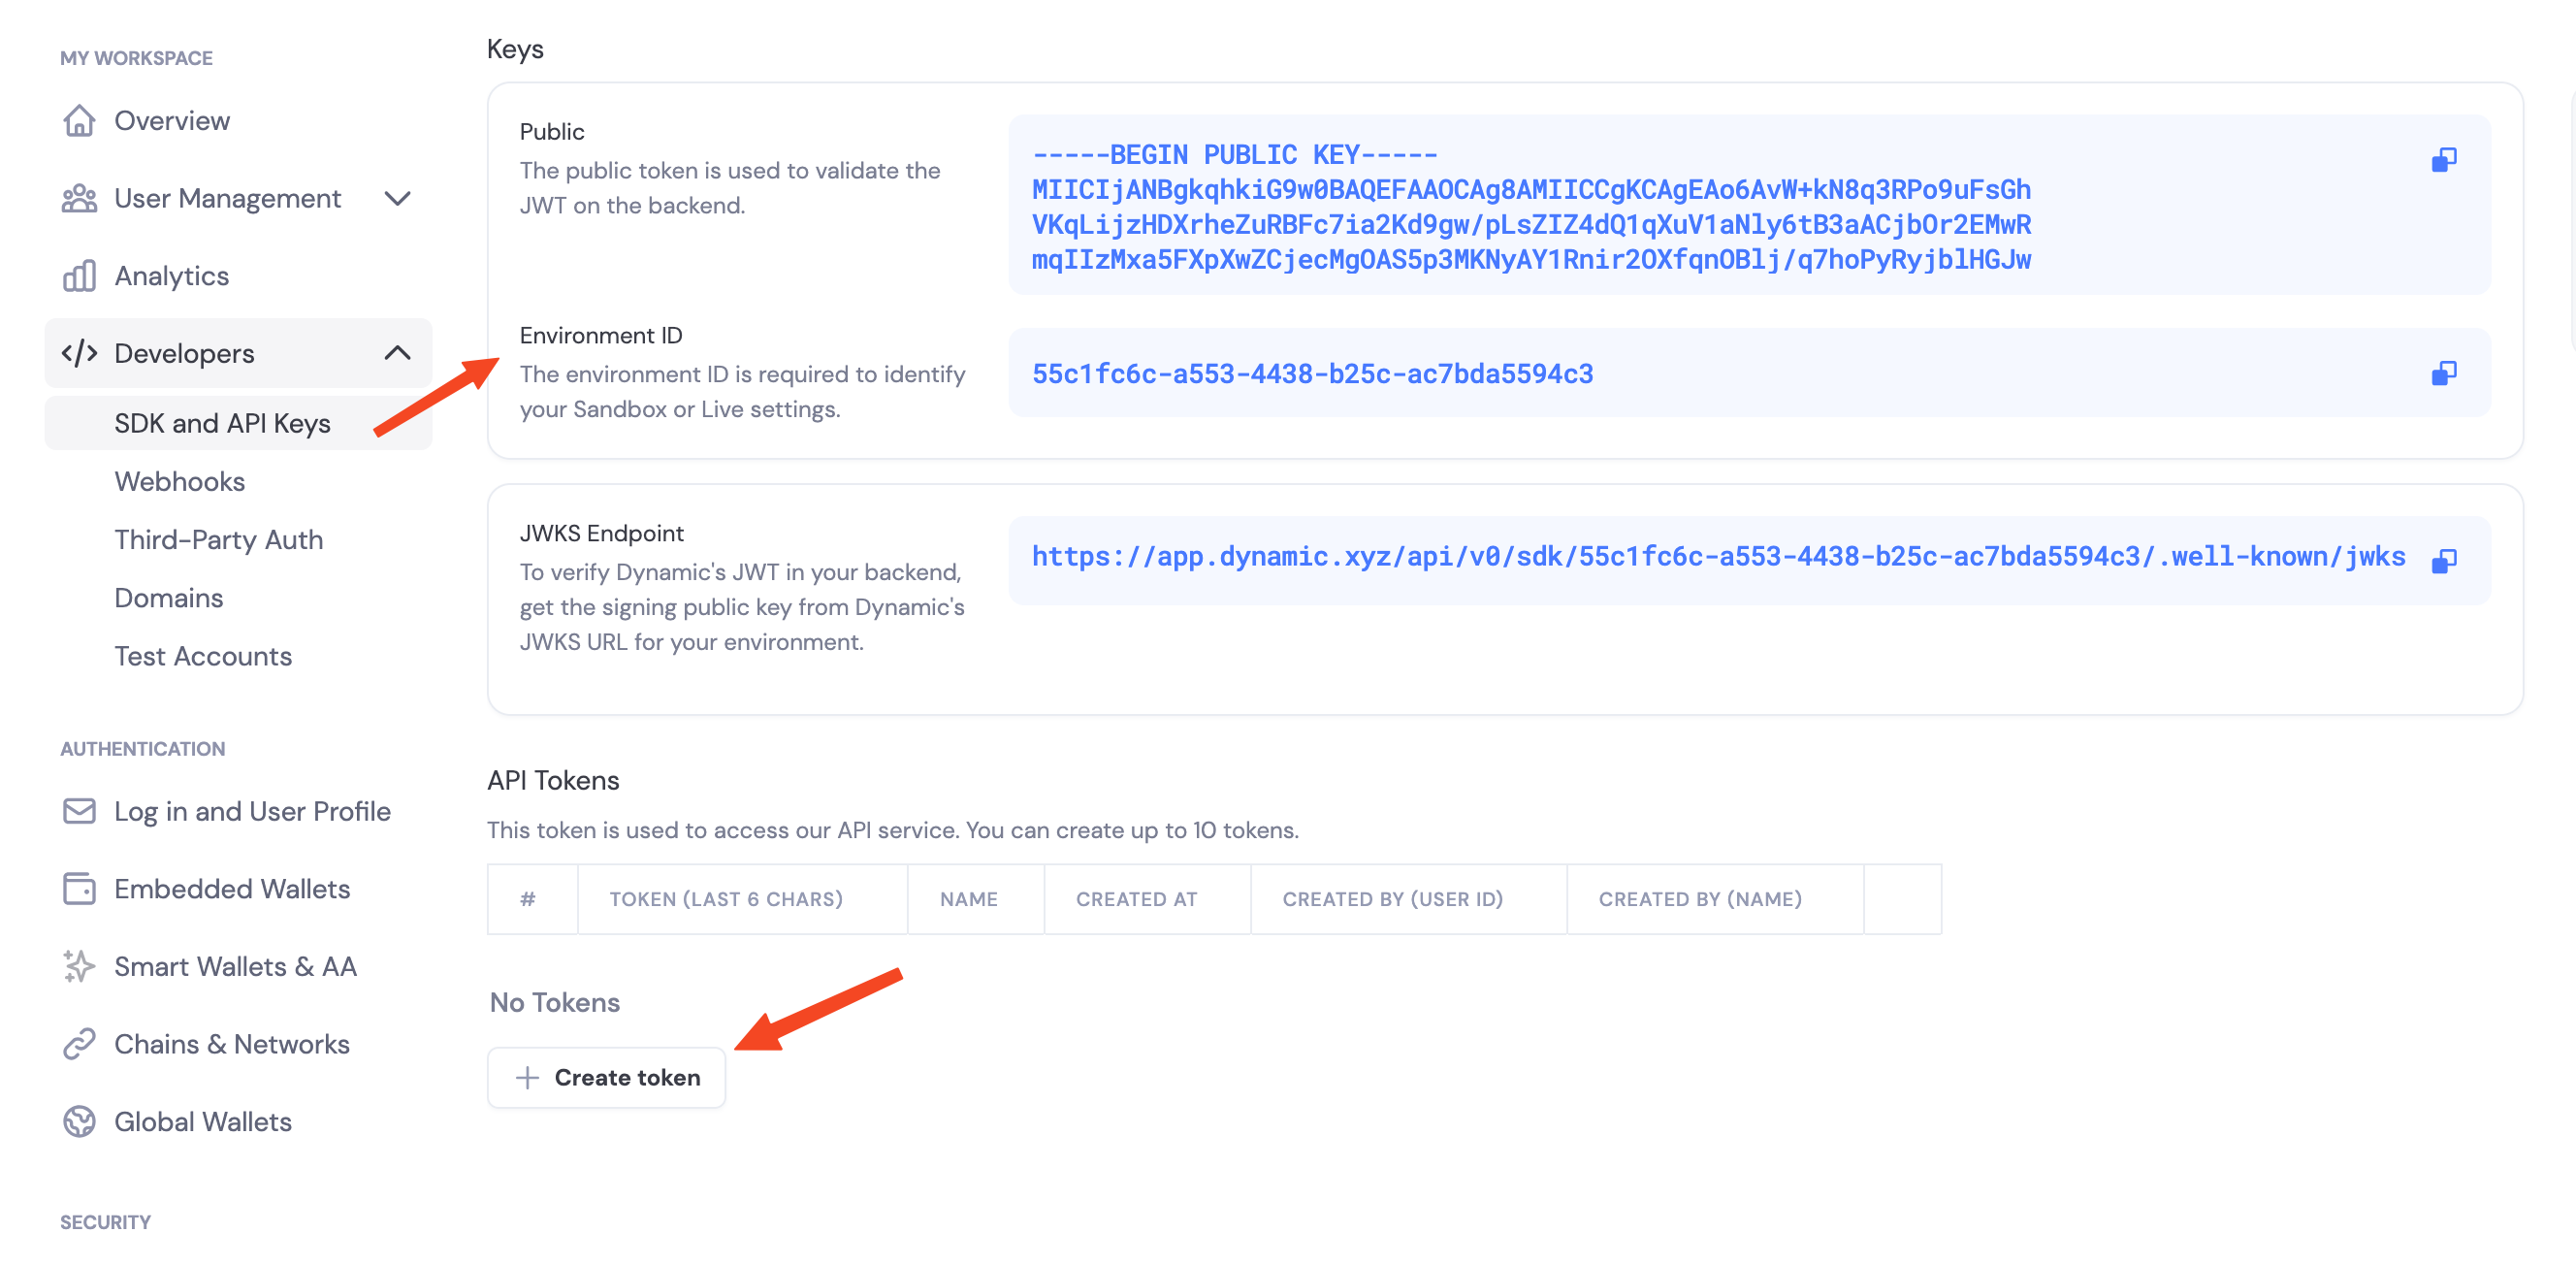
- Go to “SDK and API Keys” under the Developers section
- Copy your
Environment ID and create a new API Token - you’ll need these to authenticate your requests to Dynamic’s API
Telegram Bot Setup
Go to BotFather on telegram and create a new bot. You’ll receive a token that you’ll use to authenticate your bot.
 Copy the Bot token and save it in your
 .env file.
Supabase Setup
Head over to Supabase and create a new project. Once your project is set up, create a new table called wallets with the following schema:
CREATE TABLE wallets (
  id SERIAL PRIMARY KEY,
  tg_id BIGINT NOT NULL,
  walletAddress TEXT NOT NULL,
  walletID TEXT NOT NULL,
  created_at TIMESTAMP WITH TIME ZONE DEFAULT NOW()
);

Getting Started
1. Create a New Project
First, set up a new TypeScript project:
# Create a project directory
mkdir telegram-wallet-bot
cd telegram-wallet-bot
# Initialize the project
bun init
# Install dependencies
bun add @dynamic-labs-wallet/node-evm @supabase/supabase-js grammy viem
2. Set Up Project Structure
Create the following project structure:
telegram-wallet-bot/
├── .env                 # Environment variables
├── index.ts             # Bot entry point
├── lib/
│   └── client.ts        # Dynamic and Supabase clients
├── commands/
│   ├── wallet.ts        # Wallet creation/retrieval
│   ├── send.ts          # Send crypto functionality
│   └── sign.ts          # Message signing functionality
└── utils/
    └── getWallet.ts     # Wallet utility functions
.env file with your credentials:
# Telegram Bot Token (from BotFather)
BOT_TOKEN=YOUR_TELEGRAM_BOT_TOKEN

# Dynamic Credentials
ENV_ID=YOUR_DYNAMIC_ENVIRONMENT_ID
AUTH_TOKEN=YOUR_DYNAMIC_AUTH_TOKEN

# Supabase Configuration
SUPABASE_URL=YOUR_SUPABASE_PROJECT_URL
SUPABASE_KEY=YOUR_SUPABASE_SERVICE_ROLE_KEY
Remember to keep your environment variables secure and never commit them to
public repositories.
Implementation
Client Setup
First, let’s set up the Dynamic and Supabase clients:
import { DynamicEvmWalletClient } from "@dynamic-labs-wallet/node-evm";

export const authenticatedEvmClient = async () => {
  if (!process.env.AUTH_TOKEN || !process.env.ENV_ID) {
    throw new Error("Missing AUTH_TOKEN or ENV_ID");
  }

  const client = new DynamicEvmWalletClient({
    environmentId: process.env.ENV_ID,
  });

  await client.authenticateApiToken(process.env.AUTH_TOKEN);
  return client;
};
import { createClient } from "@supabase/supabase-js";

export const supabase = createClient(
  process.env.SUPABASE_URL || "",
  process.env.SUPABASE_KEY || ""
);
Wallet Utility Function
Create a utility function to handle wallet creation and retrieval:
import { ThresholdSignatureScheme } from "@dynamic-labs-wallet/node";
import { authenticatedEvmClient } from "../lib/dynamic";
import { supabase } from "../lib/supabase";

interface GetWalletOptions {
  tgId: number;
}

export const getWallet = async ({ tgId }: GetWalletOptions) => {
  try {
    const authenticatedClient = await authenticatedEvmClient();

    // Check for existing wallet
    const { data: existingWallet, error: fetchError } = await supabase
      .from("wallets")
      .select("*")
      .eq("tg_id", tgId)
      .maybeSingle();

    if (fetchError) {
      throw new Error(`Error fetching wallet: ${fetchError.message}`);
    }

    if (existingWallet) {
      const walletDetails = await authenticatedClient.getWallet({
        accountAddress: existingWallet.walletAddress,
      });

      return {
        walletAddress: existingWallet.walletAddress,
        walletDetails,
        isNew: false,
      };
    }

    // Create new wallet using Dynamic's server-side infrastructure
    const {
      accountAddress,
      rawPublicKey,
      publicKeyHex,
      externalServerKeyShares,
    } = await authenticatedClient.createWalletAccount({
      thresholdSignatureScheme: ThresholdSignatureScheme.TWO_OF_TWO,
      backUpToClientShareService: true,
      onError: (error: Error) => {
        console.error("Error creating wallet:", error);
        throw error;
      },
    });

    // Store new wallet in database
    const { error: insertError } = await supabase.from("wallets").insert({
      walletAddress: accountAddress,
      walletID: publicKeyHex,
      tg_id: tgId,
    });

    if (insertError) {
      throw new Error(`Error storing wallet: ${insertError.message}`);
    }

    return {
      walletAddress: accountAddress,
      walletDetails: {
        accountAddress,
        rawPublicKey,
        publicKeyHex,
        externalServerKeyShares,
      },
      isNew: true,
    };
  } catch (error) {
    console.error("Error in getWallet:", error);
    throw error;
  }
};
We pass backUpToClientShareService: true so Dynamic securely backs up the
client share to the managed Client Share Service. If you prefer to store the client share yourself,
set backUpToClientShareService: false and store it in your database. If you
do, encrypt the client share before storing it.
Command Handlers
Now let’s implement the command handlers:
Wallet Command
import type { CommandContext, Context } from "grammy";
import { getWallet } from "../utils/getWallet";

export const wallet = async (ctx: CommandContext<Context>) => {
  try {
    const tgId = ctx.from?.id;
    if (!tgId) {
      await ctx.reply("Error: Could not identify user.");
      return;
    }

    await ctx.reply("Processing wallet request...");

    const result = await getWallet({ tgId });

    if (result.isNew) {
      await ctx.reply(
        `✅ New wallet created!\nAddress: \`${result.walletAddress}\``,
        { parse_mode: "Markdown" }
      );
    } else {
      await ctx.reply(`Your wallet address: \`${result.walletAddress}\``, {
        parse_mode: "Markdown",
      });
    }
  } catch (error) {
    console.error("Error in wallet command:", error);
    await ctx.reply("❌ Error processing request. Please try again later.");
  }
};

Sign Command
import type { CommandContext, Context } from "grammy";
import { authenticatedEvmClient } from "../lib/dynamic";
import { supabase } from "../lib/supabase";

export const sign = async (ctx: CommandContext<Context>) => {
  try {
    const tgId = ctx.from?.id;
    if (!tgId) {
      await ctx.reply("Error: Could not identify user.");
      return;
    }

    const commandText = ctx.message?.text || "";
    const parts = commandText.split(" ");

    if (parts.length < 2) {
      await ctx.reply(
        "❌ Please provide a message to sign. Usage:\n/sign <message>"
      );
      return;
    }

    // Get everything after /sign as the message to sign
    const message = parts.slice(1).join(" ");

    // Fetch user's wallet from database
    const { data: userWallet, error: fetchError } = await supabase
      .from("wallets")
      .select("walletAddress")
      .eq("tg_id", tgId)
      .maybeSingle();

    if (fetchError || !userWallet) {
      await ctx.reply("❌ No wallet found. Create one with /wallet first.");
      return;
    }

    await ctx.reply("🔄 Signing message...");

    const authenticatedClient = await authenticatedEvmClient();

    // Sign the message with the wallet using Dynamic's server-side infrastructure
    const signature = await authenticatedClient.signMessage({
      accountAddress: userWallet.walletAddress,
      message,
    });

    // Reply with the original message and its signature
    await ctx.reply(
      `✅ Message signed successfully!\n\nMessage: \`${message}\`\n\nSignature: \`${signature}\`\n\nWallet: \`${userWallet.walletAddress}\``,
      { parse_mode: "Markdown" }
    );
  } catch (error) {
    console.error("Error in sign command:", error);
    await ctx.reply("❌ Error signing message. Please try again.");
  }
};
.signMessage method from the Dynamic client to sign a message with the user’s wallet. The message that is being signed is passed as a command argument by the user itself.

Send Command
import type { CommandContext, Context } from "grammy";
import { authenticatedEvmClient } from "../lib/dynamic";
import { supabase } from "../lib/supabase";
import { baseSepolia } from "viem/chains";
import { createWalletClient, http, parseEther } from "viem";

export const send = async (ctx: CommandContext<Context>) => {
  try {
    const tgId = ctx.from?.id;
    if (!tgId) {
      await ctx.reply("Error: Could not identify user.");
      return;
    }

    const commandText = ctx.message?.text || "";
    const parts = commandText.split(" ");

    if (parts.length < 3) {
      await ctx.reply(
        "❌ Incorrect format. Please use:\n/send <recipient_address> <amount_in_eth>"
      );
      return;
    }

    const recipientAddress = parts[1] || "";
    const amountInEth = parts[2] || "0";

    if (!recipientAddress.startsWith("0x") || recipientAddress.length !== 42) {
      await ctx.reply("❌ Invalid recipient address.");
      return;
    }

    const { data: userWallet, error: fetchError } = await supabase
      .from("wallets")
      .select("walletAddress")
      .eq("tg_id", tgId)
      .maybeSingle();

    if (fetchError || !userWallet) {
      await ctx.reply("❌ No wallet found. Create one with /wallet first.");
      return;
    }

    const authenticatedClient = await authenticatedEvmClient();

    // Create a public client for interacting with the blockchain
    const vm = authenticatedClient.createViemPublicClient({
      chain: baseSepolia,
      rpcUrl: "https://sepolia.base.org",
    });

    const nonce = await vm.getTransactionCount({
      address: userWallet.walletAddress as `0x${string}`,
    });

    // Prepare the transaction
    const tx = await vm.prepareTransactionRequest({
      chain: baseSepolia,
      to: recipientAddress as `0x${string}`,
      value: parseEther(amountInEth),
      nonce,
    });

    await ctx.reply("🔄 Processing transaction...");

    // Sign the transaction with Dynamic's server-side infrastructure
    const sig = await authenticatedClient.signTransaction({
      senderAddress: userWallet.walletAddress,
      transaction: tx as any,
    });

    // Send the signed transaction
    const walletClient = createWalletClient({
      chain: baseSepolia,
      transport: http("https://sepolia.base.org"),
      account: userWallet.walletAddress as `0x${string}`,
    });

    const txHash = await walletClient.sendRawTransaction({
      serializedTransaction: sig as `0x${string}`,
    });

    await ctx.reply(
      `✅ Transaction sent!\nFrom: \`${userWallet.walletAddress}\`\nTo: \`${recipientAddress}\`\nAmount: ${amountInEth} ETH\nTx: \`${txHash}\``,
      { parse_mode: "Markdown" }
    );
  } catch (error) {
    console.error("Error in send command:", error);
    await ctx.reply("❌ Error processing transaction. Please try again.");
  }
};
This example uses Base Sepolia, but you can use any chain by swapping out the
chain and the RPC URL.
.createViemPublicClient method from the Dynamic client. We prepare a transaction request and sign it using the .signTransaction method. Finally, we send the signed transaction to the blockchain.
The user provides the recipient address and the amount of ETH to send as command arguments.

Main Bot File
Finally, let’s create the main bot file that brings everything together:
// index.ts
import { Bot } from "grammy";
import { send } from "./commands/send";
import { sign } from "./commands/sign";
import { wallet } from "./commands/wallet";

// Initialize the bot with the token from environment variables
const bot = new Bot(process.env.BOT_TOKEN || "");

// Error handling
bot.catch((err) => console.error("Bot error:", err.error));

// Register commands
bot.command("wallet", wallet);
bot.command("send", send);
bot.command("sign", sign);

// Set command menu in Telegram
bot.api.setMyCommands([
  { command: "wallet", description: "Manage your wallet" },
  { command: "send", description: "Send crypto" },
  { command: "sign", description: "Sign a message with your wallet" },
]);

// Start the bot
bot.start();

console.log("Bot started successfully!");
/wallet, /send, and /sign commands.
Running the Bot
To run your Telegram wallet bot:
# Regular run
npm start
# Development with auto-reload (requires nodemon)
npm install --save-dev nodemon
npx nodemon index.ts
package.json:
{
  "scripts": {
    "start": "ts-node index.ts", // For production: runs the bot using ts-node
    "dev": "nodemon index.ts"    // For development: watches for changes and auto-restarts
  }
}
Conclusion
You’ve successfully created a Telegram bot that integrates with Dynamic’s server wallets! This bot demonstrates how to bring cryptocurrency features to messaging platforms, making blockchain technology more accessible to everyday users. If you want to take a look at the full source code, check out the GitHub repository.
For additional help or to join the community: