Overview
Policy and Rules gives developers fine-grained control over how wallets interact. Policies are enforced before a transaction is signed ensuring there is validation before execution. This allows you to:- Block malicious or unauthorized counterparties
- Create custom workflows around wallet interactions
- Ensure transactions are simulated and verified before execution
Security Model
Dynamic’s policy system is designed with security and transparency at its core:- Tamper Resistance: Policies are created and enforced in a trusted execution environment, ensuring they cannot be bypassed at the client level. Only administrators and those with permissions can update and modify rules
- Auditability: Every policy update is logged and traceable.
- Transaction Simulation: Before a transaction is signed, it is simulated against your rules. Non-compliant requests are automatically rejected.
- Malicious Transaction Detection: Before a transaction is signed, all transactions will be validated to ensure they are not being sent to a malicious address.
- Pre-Signing Enforcement: Rules apply at signing time, not just after execution. This means developers can trust that no transaction leaves the wallet unless it passes policy checks.
Allowlist Mode
When you configure an allowlist, only addresses included in your allow rules are permitted. Everything not on the list is blocked.Address Evaluation
Policies evaluate all participant addresses involved in a transaction’s execution path. If a transaction calls contract A that then calls contract B, every touched address (A and B) is considered a participant for evaluation. When using an allowlist (only listed addresses are permitted), ensure you include all relevant contract addresses, including proxies and their underlying implementations, to avoid unintended rejections.Value Limits
You can add a value limit to any rule to restrict the maximum amount that can be transferred in a single transaction. When a value limit is set, the policy will evaluate the transaction amount and automatically block any transaction that exceeds the specified limit. Value limits work for both EVM and Solana (SVM) chains, and can be applied to native tokens (like ETH or SOL) as well as custom tokens (such as ERC-20 or SPL tokens). To set a value limit for the native token of the chain, simply leave the address field for the value limit blank.Creating a Rule
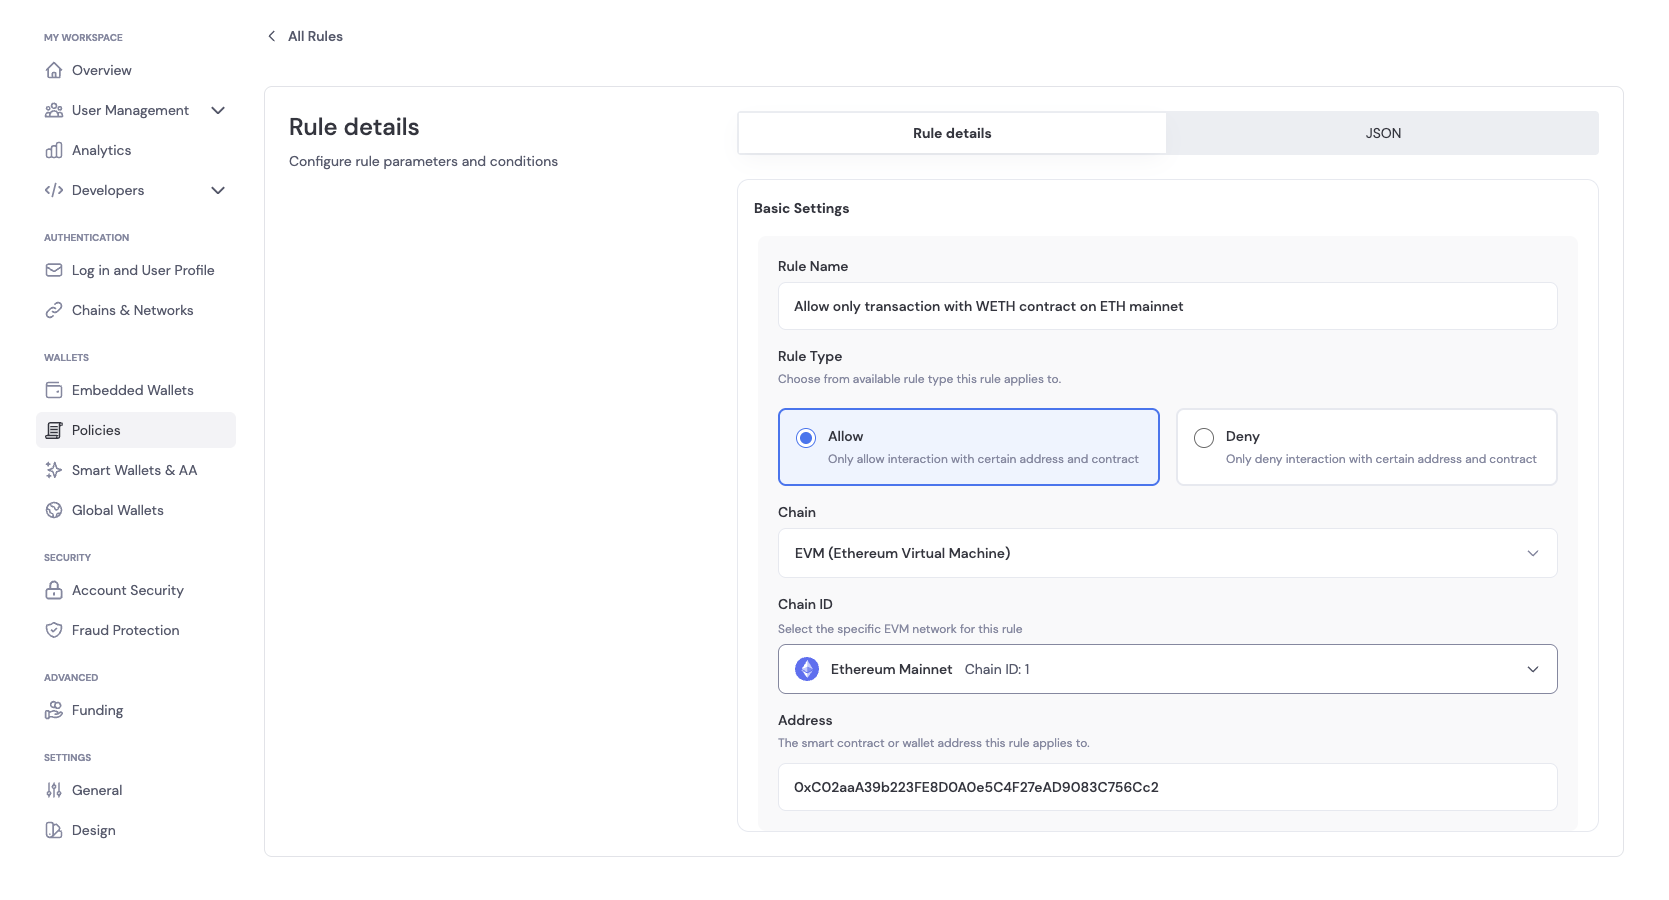
Step 1: Navigate to the Policies Tab
On the developer dashboard, navigate to the Policies tab under the Wallets section. Click on Create your first rule to get started.
Step 2: Configure the Rule
In Basic Settings, you can configure the following for the rule:- Rule Name: A descriptive name for the rule
- Rule Description: A description of the rule
- Rule Type: The type of rule to create. You can choose between:
- Allow: This rule allows the operation to proceed
- Deny: This rule blocks the operation
- Network/Environment: The specific network or environment, such as Sepolia, Base Sepolia, etc.
- Addresses: The addresses the rule applies to
Step 3: Add/Update a Rule
There are two ways to add/update a rule: you can either update using the dashboard or send an API request with your authorized token.Creating a Rule
- Click on Save Rule to create a rule by clicking on Add Rule in Basic Settings once you have configured the rule.
- You can also send an API request with your authorized token to create/update a rule. The payload can be found in the JSON tab of the Rule creation page.
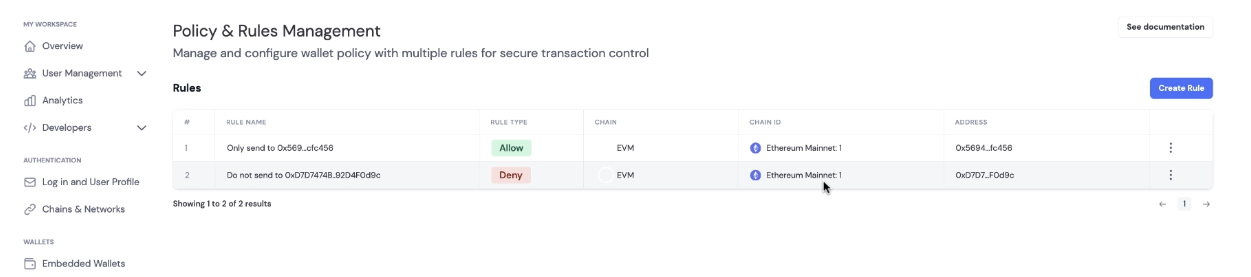
Update a Rule
If you have active rules, you will see the Policy & Rules Management tab in the Policies tab.- Click on the rule you want to update, which will expand to the Edit Rule page
- Update the rule configuration and click on Save Rule to update the rule
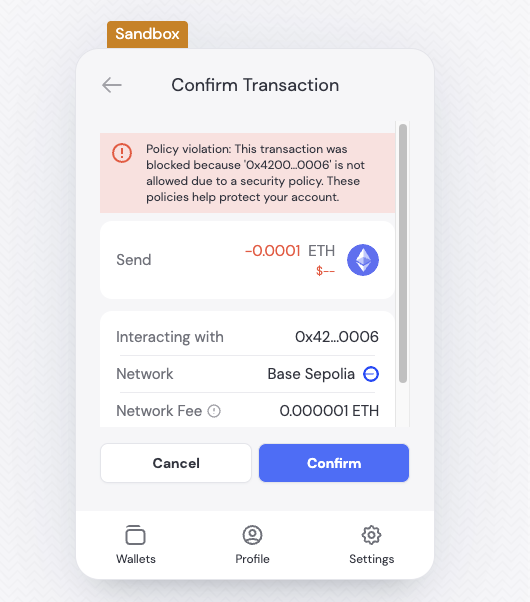
Step 4: Verifying Policy
To confirm that your policy rule is enforced, attempt to send a transaction that matches or violates the rule you configured. We recommend performing these tests on a testnet within a sandbox environment. Expected Behavior:- If the transaction complies with the policy, it will be processed as normal.
- If the transaction violates the policy, the SDK or wallet connector will return an error indicating that the operation is not permitted.
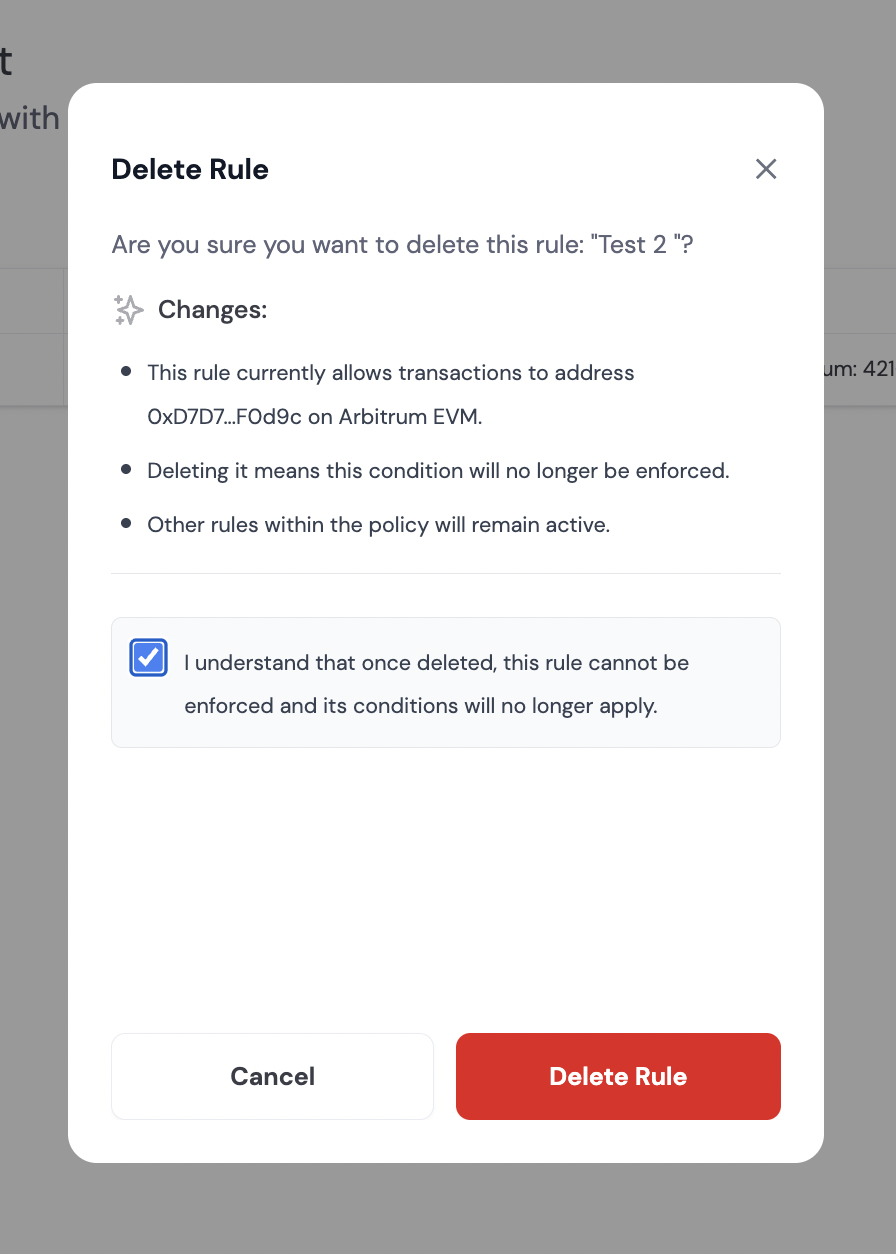
Step 5: Deleting a Rule
If you have active rules, you will see the Policy & Rules Management tab in the Policies tab.- Click
...next to the rule you want to delete, which will expand a dropdown menu with the option to delete the rule - Check the box to confirm you want to delete the rule and click on Delete Rule button
Creating, Updating, and Deleting Rules in Bulk
You can programmatically create or update multiple policy rules at once using the API. To do this, provide an array of rules in therulesToAdd, rulesToUpdate, or ruleIdsToDelete fields of your request payload.
Here is an example of how to create multiple rules using a POST request (SDKs or HTTP clients):
USDC allowlist example (Ethereum mainnet, proxy + implementation) to a single address:
USDC on Ethereum mainnet uses a proxy pattern. To allow interactions, add both the proxy and the current implementation addresses to your allowlist, on this example we are allowing interactions to a single address (0x5f09B2caaafD345EaE7B711A32CcBdf59befB4bB):Value Limit Example (Ethereum mainnet):
On this example we are allowing interactions to a single address (0x5f09B2caaafD345EaE7B711A32CcBdf59befB4bB) with a value limit of 100 USDC:Policy Violation Webhook
Dynamic emits awaas.policy.violation webhook event whenever a transaction is blocked by your configured policy rules. This event provides detailed information about what was blocked and why, making it invaluable for monitoring security, debugging rules, and discovering which addresses your users need to interact with.
Use Cases
- Building Allow-Only Rules: The webhook includes all counterparties involved in a transaction, helping you identify which addresses to add to your allowlist
- Security Monitoring: Track blocked transactions and identify potential threats or unusual activity
- Rule Debugging: Understand why legitimate transactions are being blocked and adjust rules accordingly
- Audit Trail: Maintain a complete log of all policy violations for compliance and security review
Event Payload
The webhook payload structure varies based on the violation type. Below are the fields you can expect:Always Present
| Field | Description | |
|---|---|---|
eventName | Always waas.policy.violation | |
data.errorMessage | Human-readable description of the violation | |
data.reasonCode | Type of violation (see Violation Types section for all possible codes) | |
data.publicKey | Most violations | The wallet’s public key that attempted the transaction |
data.walletId | Most violations | The wallet ID that attempted the transaction |
data.operationType | Transaction/operation violations | Type of operation blocked: evmTransaction, evmUserOperation, svmTransaction, or svmMessage |
data.chainId | Transaction/operation violations | The chain ID where the violation occurred |
Conditionally Present
The following fields may be included depending on the violation type and context:| Field | When Present | Description |
|---|---|---|
data.deniedAddresses | Address-related violations | Array of addresses that triggered the violation |
data.notAllowedAddresses | Allowlist violations | Array of addresses not on the allowlist |
data.counterparties | Address and security violations | Array of all counterparties involved with address and label fields |
data.asset | Value limit violations | Object containing asset details (address, type, symbol) |
data.maxPerCallLimit | Value limit violations | The configured maximum value limit |
data.totalOutgoingValue | Value limit violations | The attempted transaction value that exceeded the limit |
data.simulationStatus | Security validation failures | Status of the transaction simulation |
data.validationResultType | Security risk violations | Type of security validation result (e.g., “Malicious”) |
data.address | Authentication violations | Specific address involved in the violation |
Example Payloads
Below are examples of policy violation webhooks for different violation types:Address Denied Violation
When a transaction is blocked due to an address not being on the allowlist:Value Limit Exceeded Violation
When a transaction exceeds the configured value limit for an asset:Security Risk Malicious Violation
When a transaction is identified as malicious during security validation:Violation Types
ThereasonCode field indicates the type of policy violation. The webhook payload structure varies based on the violation type, but always includes the core fields needed to understand what was blocked and why.
Address-Related Violations
address_denied: Transaction blocked because an address is explicitly denied or not on the allowlist- Additional fields:
deniedAddresses,counterparties,operationType,chainId
- Additional fields:
address_not_allowed: Transaction blocked because address is not explicitly allowed in an allowlist-only configuration- Additional fields:
notAllowedAddresses,counterparties,operationType,chainId
- Additional fields:
Value Limit Violations
value_limit_exceeded: Transaction blocked because it exceeds the configured value limit- Additional fields:
asset(address, type, symbol),maxPerCallLimit,totalOutgoingValue,operationType,chainId
- Additional fields:
Security Validation Violations
security_validation_failed: Transaction simulation failed during security validation- Additional fields:
simulationStatus,operationType,chainId
- Additional fields:
security_risk_malicious: Transaction identified as malicious by security validation- Additional fields:
counterparties,validationResultType,operationType,chainId
- Additional fields:
Message Format Violations
invalid_message_format: Message format validation failed (EVM personal message, EIP-712, UserOperation, or SVM transaction/message format issues)
Setting Up Webhooks
To receive policy violation events, configure a webhook endpoint in your Developer Dashboard and subscribe to thewaas.policy.violation event. For more information on webhook setup and signature validation, see the webhooks documentation.
Additional Notes
- The list of available chains in the dashboard depends on your configuration settings. Some networks may not be available for policy validation.
- Policies and rules are currently supported only for most EVM and Solana chains, including their respective testnets.
- Sui embedded wallets are not supported at this time.